Start Here — Zero to Production
After this chapter you can
- Understand Start Here — Zero to Production
What you are going to build#
By the end you will have, running and reachable on the public internet:
- A VPC across two availability zones, with the cluster's nodes in private subnets and nothing reachable that does not need to be
- An Amazon EKS cluster running three microservices in three languages, plus MySQL as a StatefulSet with a real volume
- A CI pipeline that builds, tests, scans and refuses to publish insecure images
- A GitOps delivery loop where a
git pushbecomes a running rolling update with no human touching the cluster - Observability that tells you when it breaks, and runbooks that tell you what to do
Not a demo. Each piece is the version you would defend in a design review.
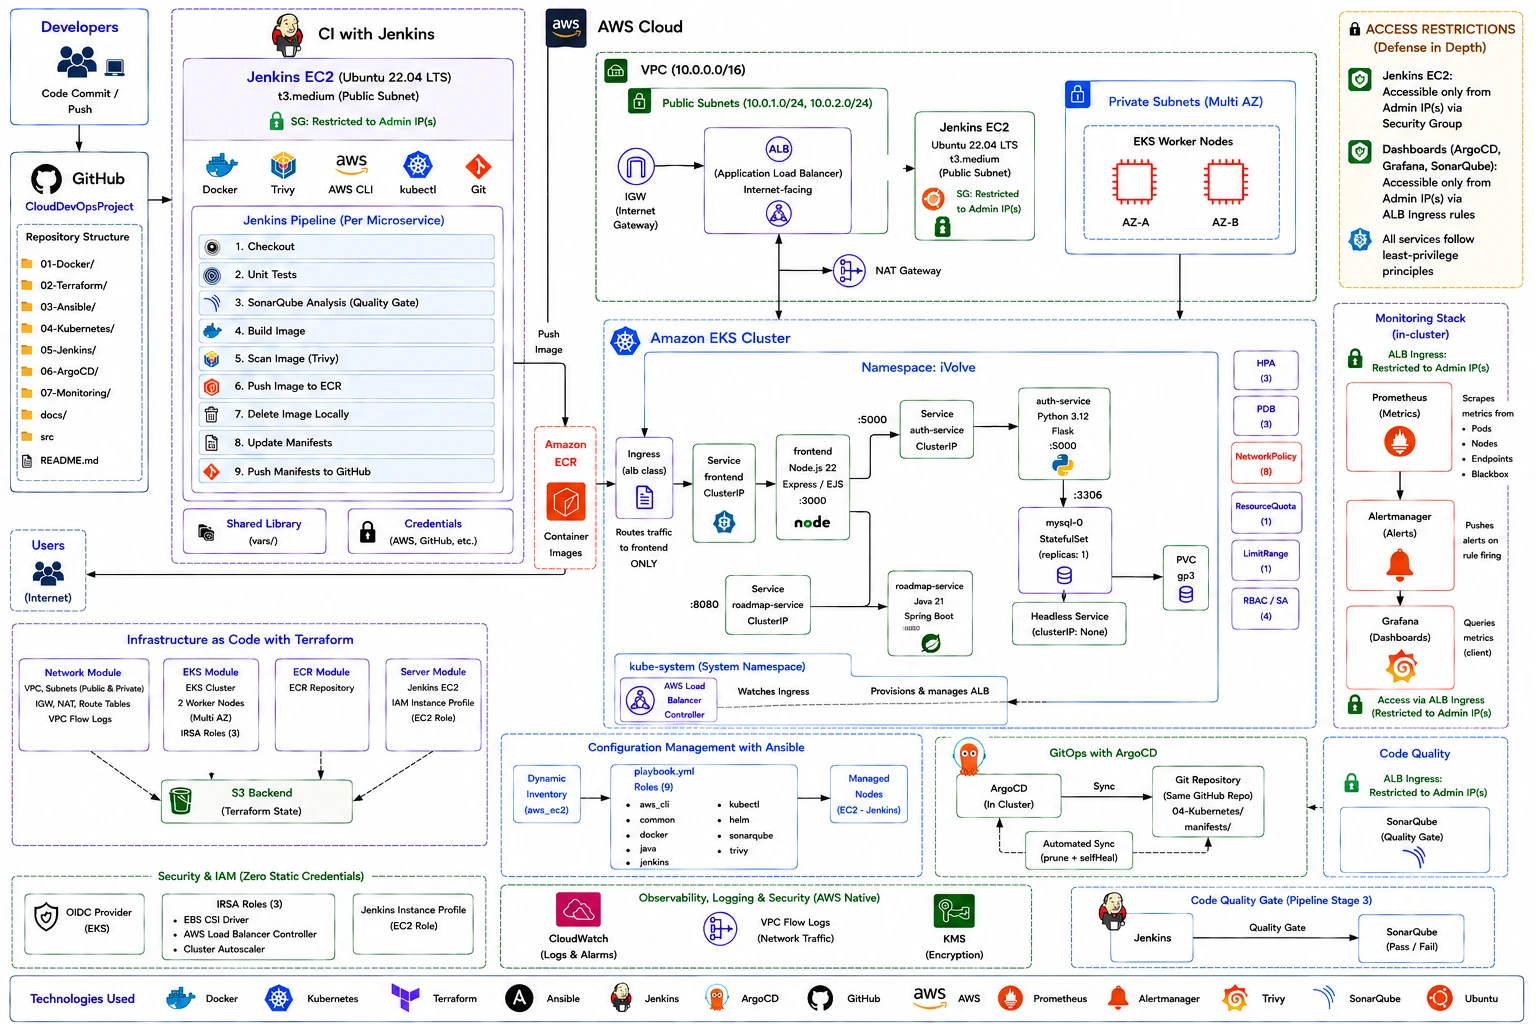
This is the destination. It is supposed to look like a lot right now — by the end of Phase 7 you will have built every box on it, and you will know why each one is there.
Before you start: the honest prerequisites#
Most tutorials skip this and you find out three hours in. Here is the truth.
You must already be comfortable with#
| Skill | Why | If not, read |
|---|---|---|
| A Linux shell | Everything happens over SSH | Linux |
| Git basics — commit, branch, push | GitOps is entirely git | Git & GitHub |
| What an IP address and a subnet are | You will design a VPC | Networking |
| YAML syntax | 90% of what you will write | any 20-minute primer |
You do not need prior Kubernetes, Terraform, or AWS experience. Those are taught here from zero.
You must have#
- An AWS account with billing enabled. The free tier does not cover this.
- A domain name in a Route53 hosted zone. ~$12/year.
- A credit card you are willing to put ~$215 on. See the cost section below.
- ~40 hours. Spread over 3–6 weeks is better than a single sprint.
Install these locally#
# Verify all at once. Anything MISSING must be installed before Phase 2.
for t in git terraform ansible aws kubectl helm kustomize jq docker; do
  printf '%-12s %s\n' "$t" "$(command -v $t 2>/dev/null || echo MISSING)"
done| Tool | Minimum | Install |
|---|---|---|
| Terraform | 1.6 | terraform.io/downloads |
| Ansible | 9.0 | pipx install ansible |
| AWS CLI | 2.15 | aws.amazon.com/cli |
| kubectl | 1.30 | kubernetes.io/docs/tasks/tools |
| Helm | 3.15 | helm.sh/docs/intro/install |
| kustomize | 5.4 | kubectl has it built in, but standalone is needed by CI |
The money conversation#
Read this before Phase 2. More people abandon this kind of project because of a surprise bill than because of a technical wall.
| Resource | Rate | A month, left running |
|---|---|---|
| EKS control plane | $0.10/hr | ~$73 |
2 × t3.medium worker nodes | $0.083/hr | ~$60 |
Jenkins t3.medium | $0.042/hr | ~$30 |
| NAT Gateway | $0.045/hr | ~$33 |
| Application Load Balancer | $0.023/hr | ~$17 |
| Total | ~$0.30/hr | ~$215 |
About $7 a day if you forget. None of it is free-tier eligible — EKS has no free tier at all.
The things that actually cost money, in order:
- The EKS control plane — $73/month whether you use it or not, from the moment it exists. It is the one charge you cannot shrink by choosing smaller instances.
- EC2 instances — two workers plus the Jenkins host. This is where instance sizing shows up.
- NAT gateway — ~$33/month each, plus data transfer. One gateway here; an AZ-redundant setup runs one per zone, which surprises everyone.
Modules 00 and 01 are free and use no AWS at all. Do them first: you will have the application running on your laptop before spending anything, and if something breaks later you will know it is infrastructure rather than code.
Destroy what you are not using#
Destructive — This removes real resources. Check which environment you are in first.
cd CloudDevOpsProject/02-Terraform
terraform destroy
Make this a habit at the end of every session. Rebuilding takes 45 minutes and costs nothing; leaving it running for a forgotten month costs about $215.
Set a billing alarm before Phase 2:
aws budgets create-budget --account-id "$(aws sts get-caller-identity --query Account --output text)" \
  --budget '{"BudgetName":"learning-cap","BudgetLimit":{"Amount":"200","Unit":"USD"},"TimeUnit":"MONTHLY","BudgetType":"COST"}'
The build path#
These seven are project build phases, not the eleven curriculum phases on Learn. They answer different questions and are meant to be used together: Learn is organised by subject, so you can read everything there is on Kubernetes in one place; this is organised by build order, so you always know what to construct next. A chapter appears in one phase of Learn and may be needed in three phases here.
Each phase has a checkpoint — a command that proves it worked. Do not move on until the checkpoint passes; a broken foundation produces failures three phases later that look like something else entirely.
Phase 0  Foundations         ~6h   read + local practice, no AWS spend
Phase 1  Containerize        ~4h   Docker, the app, local Compose
Phase 2  Infrastructure      ~6h   Terraform → VPC, EKS, ECR, EC2 ← spend starts
Phase 3  The build host      ~5h   Ansible → Jenkins and its toolchain
Phase 4  Deploy manually     ~5h   kubectl, manifests, Helm — feel the pain first
Phase 5  CI                  ~6h   Jenkins, SonarQube, Trivy
Phase 6  GitOps              ~4h   ArgoCD — remove yourself from the deploy path
Phase 7  Day 2               ~6h   monitoring, alerts, backup, chaos
Phase 0 · Foundations#
~6 hours · no AWS spend · nothing to break
Read, and practise locally. Resist the urge to skip to the fun part — every hour here saves three later.
| Read | Then do |
|---|---|
| Linux | SSH into anything. Read a systemd unit. Follow a log with journalctl -f. |
| Git & GitHub | Branch, commit, open a PR, revert a commit. You will do all four constantly. |
| Networking | Explain to yourself what a /16 and a /20 are, and what NAT does. |
| Project Overview · Architecture | Look at the architecture diagram in System Architecture and find each component in it. |
| AWS | Create an IAM user with MFA. Stop using the root account. |
Checkpoint — you can answer, without looking:
- What does
10.0.0.0/16mean, and roughly how many addresses is it? - Why can a server in a private subnet reach the internet, but the internet cannot reach it?
- What is the difference between
git revertandgit reset --hard?
If any of those are shaky, stay here. Everything downstream assumes them.
Phase 1 · Containerize#
~4 hours · no AWS spend
Build and run the application on your laptop. You cannot debug a container in Kubernetes if you cannot debug it on your own machine.
| Read | Then do |
|---|---|
| Build tools | mvn clean package the API. Understand what a .jar is. |
| Docker | Read src/roadmap-service/Dockerfile. Explain why it has two FROM lines. |
cd CloudDevOpsProject/src/frontend

mvn -B clean package                      # produces target/ivolve-api.jar
docker build -t ivolve-api:local .
docker run --rm -p 8080:8080 ivolve-api:local

# in another terminal
curl localhost:8080/actuator/health/liveness
Understand before moving on:
- Why is the build in a separate stage from the runtime? (Hint:
docker historythe image and look at what isn't there.) - Why does the runtime stage create a user and
USER ivolve? What breaks if you delete that line — and why does it matter later, at Phase 4?
Checkpoint
docker run --rm ivolve-api:local id      # must NOT print uid=0(root)
docker image ls ivolve-api:local         # should be ~200MB, not ~700MB
If it prints uid=0, the container runs as root and the restricted Pod
Security Standard in Phase 4 will reject it. Fix it now, not then.
Phase 2 · Infrastructure#
~6 hours · spend starts here · ~$215/month once running
| Read first | Why |
|---|---|
| Terraform | you are about to run it against a real account |
| VPC · IAM | you need to understand what you are creating |
| ECR · Auto Scaling | the registry, and what scales |
2.1 The state backend, once per account#
State cannot live in the bucket that holds state. This bootstraps that chicken-and-egg.
cd CloudDevOpsProject/02-Terraform/bootstrap
terraform init
terraform apply
2.2 Configure the environment#
cd ..
cp terraform.tfvars.example terraform.tfvars
cp backend.hcl.example backend.hcl   # point it at the bucket you just created
Fill in four values:
key_pair_name       = "your-existing-ec2-keypair"
trusted_admin_cidrs = ["YOUR.IP.ADDR.ESS/32"]   # curl ifconfig.me
domain_name         = "yourdomain.com"
acm_certificate_arn = "arn:aws:acm:us-east-1:...:certificate/..."
trusted_admin_cidrsrejects0.0.0.0/0— a variable validation refuses it. That is deliberate. Opening SSH to the world is the single most common way a learning project becomes a crypto miner.
2.3 Plan, read the plan, apply#
terraform init -backend-config=backend.hcl
terraform plan -out=tfplan
Actually read the plan. Not as a ritual — find these things in it:
- How many resources? (81.)
- Find the
aws_eks_node_group. How many nodes, and what instance type? - Find the
aws_nat_gateway. How many? (One — that is the cost decision.) - Find the
aws_ecr_repositoryand look forimage_tag_mutability. It isIMMUTABLE, which means a tag can never be repointed at different bytes later.
terraform apply tfplan     # ~15 minutes, mostly the EKS control plane
terraform output
Checkpoint
terraform output jenkins_public_ip
ssh ubuntu@$(terraform output -raw jenkins_public_ip) 'echo reachable'
aws eks list-clusters --query 'clusters'
If SSH hangs, your public IP changed or is not in trusted_admin_cidrs. That
is the security group working correctly.
What you just built — go look at it in the console, then find each one in
02-Terraform/modules/:
- a VPC with public and private subnets across 2 AZs
- an EKS cluster whose control plane you do not own, and a node group in the private subnets
- an ECR repository with immutable tags, empty until Phase 5 fills it
- a Jenkins EC2 instance — the only host with a public IP, and bare until Phase 3 configures it
Phase 3 · The build host#
~5 hours · the machine that is genuinely yours
The cluster already exists — Terraform created it in Phase 2, and AWS runs its
control plane. What Terraform handed you here is a bare Ubuntu instance, and
this phase turns it into a Jenkins server with Docker, kubectl, Helm, Trivy
and SonarQube on it, without you ever running apt install by hand.
If you came expecting
kubeadmhere, that is the other shape of this project: on a self-managed cluster, Ansible is what turns EC2 instances into a control plane and joins the workers. With EKS that work belongs to AWS, so Ansible's remaining job is the build host. Cluster Bootstrapping still coverskubeadm, because knowing how a cluster is actually born is what makes the managed one comprehensible rather than magic.
| Read first |
|---|
| Ansible — roles, idempotency, dynamic inventory |
| Kubeadm — what EKS is doing for you |
| Jenkins — what you are installing, and why |
3.1 Secrets#
cd ../../../ansible
cp group_vars/vault.yml.example group_vars/vault.yml
$EDITOR group_vars/vault.yml         # fill in real values
ansible-vault encrypt group_vars/vault.yml
echo 'your-vault-password' > .vault_pass && chmod 600 .vault_pass
3.2 Prove connectivity before running anything#
ansible-galaxy collection install -r requirements.yml
ansible-inventory --graph     # must list the Jenkins host
ansible all -m ping           # must be green
If
--graphis empty, the dynamic inventory found no hosts. It is theaws_ec2plugin filtering on tags, so an instance with the wrong tag is invisible to it. This is the single most common failure here, and it reads like an Ansible bug when it is a tagging problem.The reason to use dynamic inventory at all: a static file of IP addresses is wrong the first time an instance is replaced, and nobody remembers to update it.
3.3 Configure the host#
Run it once, then read what it did. The playbook calls nine roles, one per tool, and each is idempotent — the second run should report no changes at all.
ansible-playbook playbook.ymlThat single command installs the AWS CLI, Docker, Java, Jenkins, kubectl, Helm,
Trivy and SonarQube, and applies the baseline hardening in common. Every one
of those roles is a chapter's worth of material; this is where the reading pays
off.
Then prove idempotency, which is the whole point of configuration management:
ansible-playbook playbook.yml        # again
# changed=0 — if anything reports changed, a task is not idempotent
A playbook that keeps reporting changes is one you cannot trust to run safely, because you can no longer tell "nothing needed doing" from "something drifted".
3.4 Get cluster access#
The cluster came from Terraform, so you ask AWS for the credentials rather than copying a file off a control-plane node:
aws eks update-kubeconfig --name <cluster-name> --region us-east-1
kubectl get nodes -o wide
Checkpoint
kubectl get nodes                     # both Ready
kubectl -n kube-system get pods       # all Running, no CrashLoopBackOff
kubectl get --raw /readyz             # ok
If kubectl returns error: You must be logged in to the server (Unauthorized) — your IAM identity has no access entry on the cluster.
Creating an EKS cluster does not automatically grant your user permission to
use it; that is a separate grant, and it catches everyone once.
If nodes never become Ready — check that the node group's subnets have a
route to the NAT gateway. A node that cannot reach the internet cannot pull the
CNI image, and a node without a CNI stays NotReady forever while looking, in
the console, perfectly healthy.
Phase 4 · Deploy manually#
~5 hours · do this before automating it
This phase is deliberately manual. Automating a deployment you have never done by hand produces someone who can run a pipeline but cannot fix one.
| Read | Then do |
|---|---|
| Kubernetes | apply the base manifests one file at a time |
| Helm | install the same thing as a chart, compare |
| Kustomize | see how overlays differ from templating |
cd CloudDevOpsProject

# One at a time. Read each file before applying it.
kubectl apply -f kubernetes/base/namespace.yaml
kubectl apply -f kubernetes/base/configmap.yaml
kubectl apply -f kubernetes/base/api-deployment.yaml

kubectl -n ivolve get pods -w
Now break it on purpose. This is the most valuable hour of the whole course:
# 1. Point at an image tag that does not exist
kubectl -n ivolve set image deploy/ivolve-api ivolve-api=ivolve-api:nope
kubectl -n ivolve get pods          # ImagePullBackOff
kubectl -n ivolve describe pod <pod> | tail -20   # read the Events

# 2. Delete a pod and watch it come back
kubectl -n ivolve delete pod <pod>
kubectl -n ivolve get pods -w       # the ReplicaSet replaces it

# 3. Break the readiness probe and watch traffic drain
kubectl -n ivolve edit deploy ivolve-api   # change readiness path to /nope
kubectl -n ivolve get endpointslices -l kubernetes.io/service-name=ivolve-api # the pod IP disappears
Understanding why the endpoint list empties is the difference between knowing Kubernetes vocabulary and knowing Kubernetes.
Checkpoint
kubectl -n ivolve rollout status deploy/ivolve-api
kubectl -n ivolve run probe --rm -it --restart=Never --image=curlimages/curl:8.8.0 \
  -- curl -sf http://ivolve-storefront/healthz
Phase 5 · Continuous Integration#
~6 hours
cd 03-Ansible
# Jenkins was installed in Phase 3; this is where you configure the pipeline
Then wire the GitHub webhook: repository → Settings → Webhooks →
https://jenkins.<your-domain>/github-webhook/, content type application/json,
push events only.
Now make the pipeline fail, deliberately. A gate you have never seen fire is a gate you do not trust:
- Break a test. Push. Watch the pipeline stop at stage 2. Nothing is built.
- Add a vulnerable dependency (an old
log4j, say). Push. Watch Trivy stop it at stage 3. Nothing is built. - Delete a unit test so coverage drops below 80%. Push. Watch the SonarQube quality gate abort the pipeline.
Checkpoint — a green run that ends with a commit to
kubernetes/overlays/dev/kustomization.yaml changing the image tag. Find that
commit in git log. That commit is the deployment.
Phase 6 · GitOps#
~4 hours · where it becomes a platform
kubectl apply -f 06-ArgoCD/Then do the demonstration that makes GitOps click:
# Change the cluster by hand, the way a panicking engineer would
kubectl -n ivolve scale deploy ivolve-api --replicas=7
kubectl -n ivolve get deploy ivolve-api

# Wait up to three minutes, then look again
kubectl -n ivolve get deploy ivolve-api
It goes back. selfHeal reverted you, because git said otherwise. That single
behaviour is the whole argument for GitOps: the cluster cannot drift from
what was reviewed and merged.
Now do a real deploy the real way:
git commit --allow-empty -m "trigger" && git push
# Jenkins builds → commits a tag → ArgoCD syncs → rolling update
watch kubectl -n ivolve get pods
Checkpoint — you changed production without ever running kubectl apply,
and git log shows who, what and when.
Phase 7 · Day 2 operations#
~6 hours · what separates "it works" from "you can run it"
| Read |
|---|
| Observability · Prometheus · Grafana |
| Disaster Recovery · Chaos Engineering |
| Troubleshooting — keep this open forever |
helm upgrade --install monitoring prometheus-community/kube-prometheus-stack \n  -n monitoring --create-namespace -f 07-Monitoring/kube-prometheus-stack-values.yaml
kubectl -n monitoring port-forward svc/kube-prometheus-stack-grafana 3000:80
Then run the exercises that prove it works:
# 1. Kill a node. Watch the ASG replace it and pods reschedule.
aws autoscaling terminate-instance-in-auto-scaling-group \
  --instance-id <worker-id> --no-should-decrement-desired-capacity

# 2. Snapshot etcd, and read the restore runbook until you could do it under pressure
sudo ./scripts/backup-etcd.sh dev

# 3. Deliberately trip an alert and watch it route
kubectl -n ivolve scale deploy ivolve-api --replicas=0
# DeploymentReplicasMismatch fires after 15 minutes
Final checkpoint
./scripts/health-check.sh dev # must exit 0You are done. Now what?#
Prove it to yourself#
Destroy the whole environment and rebuild it from nothing:
Destructive — This removes real resources. Check which environment you are in first.
terraform destroy
./scripts/bootstrap-platform.sh dev
If that works unattended, you have genuinely automated it. If it does not, you have found the manual step you forgot you did — which is exactly the thing that bites teams at 2am.
Prove it to other people#
- Screenshots while it is running. See
screenshots/README.mdfor the ten worth taking. Once youterraform destroy, they are gone. - Write the decisions in your own words.
docs/ARCHITECTURE.mdanddocs/SECURITY.mdexplain the ones that were made for you. Being able to argue them out loud is what an interview actually tests. - Read Interview Prep with the platform still running, so the answers are concrete rather than remembered.
Then extend it#
In roughly the order of value:
- Centralised logging (Loki) — metrics without logs is half an observability story
- Progressive delivery (Argo Rollouts) — catch the bad release that starts fine
- Image signing (Cosign) — scanning proves what is in an image, signing proves where it came from
- A second region — the honest gap in every HA table in this repo
When you get stuck#
In this order:
- Read the error. Actually read it. Kubernetes errors are unusually good.
kubectl -n <ns> describe pod <pod>— the Events at the bottom.kubectl -n <ns> logs <pod> --previous—--previousis the important flag for a crash loop; the current container has not logged anything yet.- Troubleshooting — the failures you will actually hit, with fixes.
docs/runbooks.mdin the platform — one entry per alert.
The single most useful habit: when something breaks, write down what you changed in the last ten minutes. It is almost always that. Contents | Project Overview |